Simple Vehicle Expenses Tracking and Organization
Table of Contents
Do you find it tedious to log and organize vehicle expenses, by vehicle? Read on to solve this problem.
This article is intended for those that want to learn how to add vehicles to Falcon and organize their vehicle expenses by vehicle. It’s easy to keep track of expenses for a specific vehicle with Falcon Expenses whether you drive one car for work, or a few.
In this article, we showcase the flexibility of Falcon Expenses to make organizing and tracking car expenses easy and convenient for anyone. No matter what your specific needs are. Vehicle expenses include everything from mileage, maintenance, gas, repairs, etc.
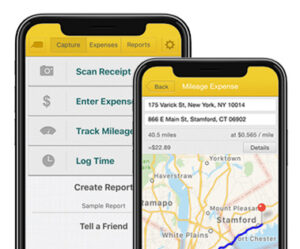
If you’re not already familiar, Falcon Expenses is a mobile application for tracking mileage and expenses. Track business mileage with an integrated GPS tracker and keep track of an odometer log. In addition, log car maintenance, repairs, gas, etc. Also, attach receipt images to these expenses.
There are various ways to track your vehicle expenses with Falcon. This is quite useful for delivery drivers, realtors, or anyone that uses the car for work. Pick one that suits you best and use this article as a guide to discover the one that suits you best.
Vehicle Tag
Each expense you add to Falcon has a ‘Tag’ field where you can add tags, such as personal or business to your expenses. You can also create custom tags. For organizing vehicle expenses using this method you create a custom tag. We suggest that you name this tag your vehicle’s make, model, year, etc. You can even add the start odometer reading to the tag name.
For example, your tag might look something like this:
Truck
Family Car
Ford Escort
2019 Ford Escort, Jan 1 Start Reading: 10,345
Ford Escort, 2021 Start Reading: 10,345
We think you get the picture.
Once you have created your Vehicle Tag, each time you save a vehicle expense for that particular vehicle, you add that tag. It’s that simple.
How do you create a Vehicle Tag?
Open any of the expense capture forms (i.e. Enter Expense, Odometer Log, Addresses Expense, GPS Tracker, Time Log) and tap on the ‘Tags’ field and select, ‘Create Tag’.
Next, all you have to do is enter the name of your tag.
How do I view all the expenses for my vehicle?
Filter your expenses by your Vehicle Tag to view all expenses and mileage that you added for your vehicle. To do this, from the Expenses List, tap on the filter icon (located in the upper left on the sort/filter bar). This takes you to the filter selection page. On this page, tap on the name of your Vehicle Tag.
Next, you are taken back to the Expenses List and the only expenses that show are the expenses that have been tagged with your Vehicle Tag.
In addition, this filter shows you the summation of all of the expenses that you have tagged with your Vehicle Tag (in the upper right). Therefore, quickly glance at all the expenses you incurred for mileage, gas, maintenance, or any other expenses you incurred with your vehicle.
Pro tip
Select all of the filtered expenses by tapping in the select all button and tap add to report. Add all of your vehicle expenses to one report and email this report to anyone, such are your accountant. This is super convenient for delivery drivers. Or those that need to send regular (i.e. monthly or quarterly) vehicle expense reports to an accountant or manager.
Vehicle Category
Each expense you add to Falcon has a ‘Category’ field. Use the category field to add categories to your expenses, such as transportation, food, entertainment, etc. Further, create custom categories as well as custom tags. For organizing car expenses using this method you create a custom category. We suggest you name this category your vehicle make, model, year, etc. You can even add the start odometer reading to the category name.
For example, your category might look something like this:
Truck
Family Car
Ford Escort 2019
Ford Escort, Jan 1 Start Reading: 10,345
Ford Escort, 2021 Start Reading: 10,345
We think you get the picture.
How do you create a Vehicle Category?
Open any of the expense capture forms (i.e. Enter Expense, Odometer Log, Addresses Expense, GPS Tracker, Time Log) and tap on the ‘Category’ field and select, ‘Create Category’.
Next, all you have to do is enter the name of your category.
How do I view all the expenses for my vehicle?
Filter your expenses by your Vehicle Category to view all expenses and mileage you added for your vehicle.
To do this, from the Expenses List, tap on the filter icon (located in the upper left on the sort/filter bar). This takes you to the filter selection page. On this page, tap on the name of your Vehicle Category.
Next, you are taken back to the Expenses List and the only expenses that show are the expenses that have been tagged with your Vehicle Category.
In addition, this filter shows you the summation of all of the expenses you have categorized with your Vehicle Category (in the upper right). Therefore, quickly glance at all the expenses you incurred for mileage, gas, maintenance, or any other expenses you incurred with your vehicle.
Pro tip
Select all of the filtered expenses by tapping in the select all button and tap add to report. Add all of your vehicle expenses to one report and email this report to anyone, such are your accountant. This is super convenient for delivery drivers. Or those that need to send regular (i.e. monthly or quarterly) vehicle expense reports to an accountant or manager.
Vehicle Report
This one is our favorite, and we think it is the most straightforward and easiest one to implement. We saved the best for last.
To use this method all you have to do is create a report and name it after your vehicle. As you incur vehicle expenses, add them directly to the report.
This way when you export your Vehicle Report, the name of your vehicle is at the top of the report and all the expenses you added to the report. All your vehicle expenses in your Vehicle Report are neatly included in the body of the report.
How do I create a Vehicle Report?
Tap on the Create Report button located on the Capture Screen. Name the report after your vehicle. Each time you want to add a vehicle expense, open the report and tap, Add Expenses.
It’s that simple.
To learn more about what exported reports look like check out this article, you are going to love what we have created for you: What Exported Falcon Reports Look Like.
About Falcon Expenses
Falcon Expenses is a mobile application for expense tracking and reporting. Falcon customers record $6,600, on average, in annual tax deductions. Get started today. The longer you wait the more tax deductions you miss out on.
Automatically track mileage expenses and expenses, keep an odometer log, receipt vault and log billable hours. Quickly organize expenses by time period, project, or client and easily prepare reports to email to anyone in PDF or spreadsheet formats, all from your phone. Use for keeping track of tax deductions, reimbursements, taxes, record keeping, and more. Falcon Expenses is great for self-employed, freelancers, realtors, business travelers, truckers, and more.
Check out the following articles for more information about Falcon Expenses features and services:
- Manage Receipts with Falcon Expenses
- Track Mileage Expenses with Falcon Expenses
- Create an Expense Report with Falcon Expenses
- What is Included in Falcon Expenses Mileage Expense Log
Was this article helpful?
We are a team of writers and contributors with a passion for creating valuable content for small business owners, self-employed, entrepreneurs, and more.
Feel free to reach out to use as support@falconexpenses.com